 |
Equipement:
- A digital scale (not compulsery, but handy)
-
A large cookie sheet covered with parchment paper (or a silicon mat)*
-
A large mixer (at least 4.7 l) with whip, spatula and hook (not compulsery, but very, very handy)**
- A
thermometer to check water and oven temperature (not compulsery, useful at first perhaps)
-
A plastic bottle with a conic spout to spray water at the bottom of the oven while baking (a plain water bottle with a pierced cap will do, as well as any water pistol!)
Ingredients:
- 2 cups of non-chlorinated, lukewarm water (maximum 115°F/46°C, minimum 74°F/23°C)
-
2 teaspoons active dry yeast (instant)***
-
1 teaspoon sugar****
-
400g (2cups+ 2/3 cup) unbleached white flour (wheat, organic)
-
308g (1cup +2/3 cup) wholemeal flour (wheat, organic): this flour contains the whole wheat grain (bran, endosperm and germ).
-
2 teaspoon sea salt
-
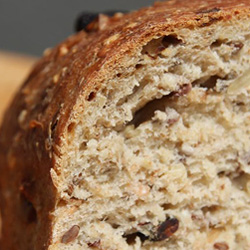
300g (11/2 cup) grain: sunflower, flax, chia, sesame etc. and small dried fruit (raisins, cranberries, dried apricots chopped etc...) You can choose one or the other of these ingredients; it has no impact on the recipe***** |
Notes: *or two small cookie sheets with each a piece of parchment paper or silicon mat
**I used the KitchenAid Artisan 5-Quart 325W for this recipe. It comes with whip, spatula and hook. You can also knead the dough with your hands but it takes longer (15 minutes, instead of 10 with the mixer). The kneading process implies folding the dough in two and then pushing it, in order for the folds to disappear. Play with the dough vigorously. If you intend baking bread every week (or having your kids make the bread), buying a mixer would be a good idea. Making bread weekly would also be a great idea.
***Make sure the active yeast you use is still active! If it hasn't been used for some time (or not refrigerated once opened): mix 7g (1 packet, 1/4 oz, 1/2 tablespoon) of instant yeast with 1/4 cup of warm water (100-110°F or 37-43°C) in a coffee cup. Mix in a teaspoon of sugar. 10 minutes later, this mixture should have doubled in size. After 30 minutes, we're talking volcanic eruption!
****The teaspoon of sugar is not compulsory. It helps the yeast to activate more quickly. In the winter, when room temperature are cooler, the sugar helps maximise the rising of your bread. But you'll have edible bread with or without using sugar.
*****Here is an example of a whole grain and dried fruit mix that works well: 150g raw, unsalted sunflower seeds, 30g whole flax seeds, 20g whole chia seeds, 25g whole sesame seeds, 75g dried cranberries (sweetened or not).
Procedure: 1. Install the whip on the mixer. Beat at slow speed, for 1 minute, 2 cups of warm water, 2 teaspoon of active dry yeast and the optional teaspoon of sugar (see preceding note **** ). (If your are not using a mixer, whip in a large bowl)
2. Replace the whip with the flat spatula.
3. Add about half the white flour (200g), half the wholemeal flour (154g), 2 teaspoons salt and all of the fruit and grain mix.
4. Mix all these ingredients for 1 minute at low speed. (If your are not using a mixer, mix with a large wooden spoon).
5. LIft the mixer and remove the dough from the spatula before replacing it with the dough hook. Add the remaining other half of flour (200g white and 154g wholemeal), if you are not using a mixer, gather your mix and get it ready to knead on a well floured surface (table, countertop).
6. Knead 5 minutes at first speed and another 5 minutes at second speed. If the mix becomes stuck in a ball around the hook and simply spins around the bowl, stop the mixer and remove the dough from the hook, tear it in two and start the mixer again. A proper kneading is important and you will need to repeat this procedure if this happens again. The size of the bowl used in relationship with the amount of dough in the bowl can have an impact on the kneading efficiency of the mixer. This recipe (2 loaves of bread) works well with a 4 litre mixer. You can't really mix more dough with this size mixer without risking it being overworked and eventually breaking down. Where kneading is concerned, more is preferable to less. (when using your hands to knead the dough, fold repeatedly in two and then in four before pushing it all down and starting again, as described earlier in **. Massage the dough 3 times in this fashion during 5 minutes each time).
7. Stop the mixer, sprinkle flour on your fingers before you remove the ball of dough from the hook; the flour will help you deal with the stickyness of the dough.
8. Brush the interior of a bowl (glass,plastic, metal) with olive or vegetable oil. Your bowl should be able to hold twice the volume of the unrisen dough ball. Roll the dough ball around in the bowl so that it is completely covered with oil. Cover the bowl with plastic wrap, let the dough rise for an hour in a warm place (top of the fridge, near a sunny window...) The warmer (at least >20°C) the environment the better.
9. Place the risen dough ball on a large biscuit pan covered with parchment paper (or silicon mat), cut it precisely in two with a spatula and place the two pieces far enough one from the other so that they have enough room to rise and reach their full volume (1 1/2 their actual size). The pieces should be placed torn side down so that they are siting on their cut. Again (see * above), if you don't have a big enough pan, use two smaller ones. This procedure can only be followed if you are making bread with lots of grains; if you had only used plain white flour and no grains, the bread would not hold together and you would need a mould.
10. The next step is critical for the proper rising of the dough. Place the pan on the middle shelf of the oven. Place another container full of very hot water (at least a litre) under the bread pan (a glass lasagna type dish or other metal container will do). Turn on the oven light. This warm and damp environment will help the dough rise further. Let the dough rise between 60 (in a rush) and 90 minutes (if you can). CAREFUL: the oven temperature should be between 85°F and 100°F (30°C-38°C) so if you have used the oven earlier on, make sure it has had time to cool down. In winter, you can heat the oven for a minute before going through with this step, but the hot water usually provides the correct temperature.
11. Now for the baking of the bread: Remove the pan from the oven and turn on the thermostat to 450F (230°C). You can keep the hot water container in the oven. Try to keep the bread from getting cold while waiting for the oven temperature to rise (maybe put it on top of the fridge). In the summer there is no such problem. Do not shake the pan; cold and shock might deflate the bread. Before placing the bread in the oven to bake, first spray water at the bottom of the oven (approx. 1/8 cup).This procedure will help give colour and texture to the bread crust. You need to proceed quickly as to not lower the oven's temperature while you spray with the door open. Following the spraying of water, put the bread in the oven. Repeat the spraying procedure after 5 minutes baking time and again after another 5 minutes. After this 10 minutes of baking at 450°F, lower the oven temperature to 375°F(190°C) for between 20 and 30 minutes. If you want a softer bread (not for toasting), bake at 450F for 15 minutes and then at 350°F (175°C) for 10 minutes. Spray the bottom of the oven every 10 minutes. When the bread is golden, take the pan out of the oven and put the loafs on a cooling wire rack (you can use an oven grid which was removed from the oven beforehand). The interior of the loaf keeps on cooking for about an hour while the exterior cools down. After an hour you can indulge in a slice. This bread is delicious and wholesome toasted for breakfast. It can be frozen in a plastic bag or kept in the pantry for a few days in a non vacuum bag (or bread bag). |
